
Introduction
A monitor arm can lift a screen off the desk, free up room for a keyboard and make it easier to position a display at a comfortable height. If you’re considering a Samsung Odyssey G4 monitor arm, the important question isn’t simply whether an arm can hold a gaming monitor. It’s whether the arm suits your exact G4 model, desk and preferred setup.
I’d start with three checks: the monitor’s VESA mounting pattern, its weight without the original stand, and the arm’s minimum and maximum supported weight. Then look at the desk clamp, movement range and how easily the arm can be adjusted.
The product details supplied for this guide describe a MOUNTUP heavy-duty arm rated for screens from 22 to 49 inches, weights from 4.4 to 44 pounds, and VESA patterns of 75 × 75 mm or 100 × 100 mm. Those are useful example specifications, but they don’t prove that every arm or every G4 variant is compatible. I haven’t personally tested this combination, so I’ll keep the advice practical: check your model’s manual and the mount’s current specifications before you buy.
Why consider a monitor arm?
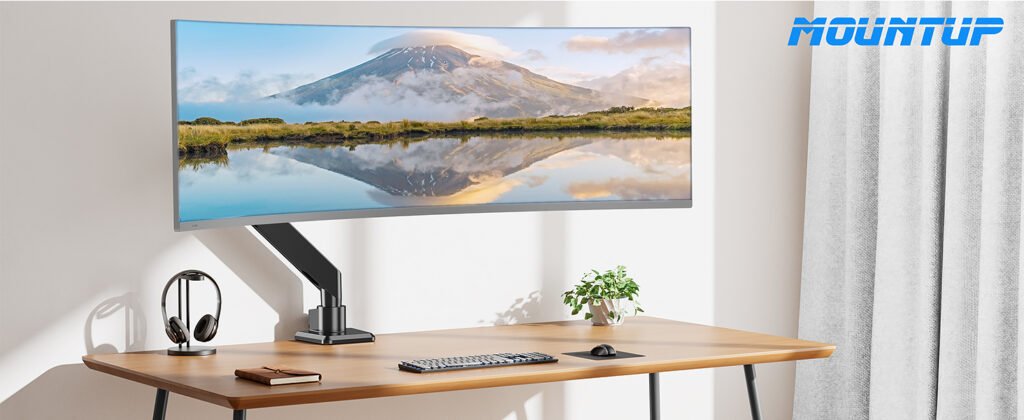
The first benefit is desk space. A standard monitor stand takes up a patch of the desktop, while a clamp-mounted arm holds the display above it. That can make a noticeable difference on a compact desk used for gaming, studying or working from home.
An arm also gives you more control over screen position. You can often adjust height and viewing angle without shifting the whole desk arrangement. That’s handy if you switch between sitting back with a controller and leaning closer to read small text.
There’s a comfort benefit, too, though an arm isn’t a magic fix for poor posture. I’d position the screen so you can look at it without craning your neck, then adjust your chair and desk around that position. Your preferred height will depend on your chair, eyesight and whether you wear glasses.
A monitor arm may suit you if you want to:
- Clear space beneath the screen for notes, speakers or a keyboard.
- Adjust the display’s height or angle more easily.
- Reposition the screen when sharing a desk or changing activities.
- Create a cleaner-looking setup with managed cables.
The trade-off is that an arm needs a suitable desk edge or mounting hole, careful installation and the right tension setting. A stable stand may be the simpler option if you rarely move your screen.
Check the G4’s mounting compatibility
Before choosing a mount, find the precise model code on the monitor or its documentation. Product names can cover different sizes, model years and regional variants, so don’t rely on “Odyssey G4” alone. The manual or manufacturer’s support page should tell you the mounting pattern and screen weight.
The MOUNTUP listing used as an example here specifies VESA 75 × 75 mm and 100 × 100 mm. VESA is the standard spacing of the threaded mounting holes on the back of a display. Your monitor’s pattern needs to match the arm’s plate, either directly or with an appropriate adapter.
Next, check the monitor’s weight without its stand. Don’t compare an arm’s capacity with the boxed weight or the weight of the monitor and stand together. The example arm’s listed lower limit is 4.4 pounds, as well as its 44-pound upper limit. An arm that is rated for heavy screens may still be unsuitable for a very light monitor if the spring can’t be adjusted down far enough.
Finally, check that the mounting plate and screws suit the G4. Never force a screw that seems too long or incorrectly threaded. A mismatch can damage the display or leave it insecure.
Choosing an arm for the Samsung Odyssey G4
A good fit depends on more than screen size. Compare the screen’s weight and VESA pattern with the arm’s full specifications, including its minimum supported load. Some arms are made for large ultrawide monitors and may have a different range of movement or tension adjustment from a light, smaller screen.
The supplied listing describes an arm designed for monitors from 22 to 49 inches and 4.4 to 44 pounds, with support for 75 × 75 mm and 100 × 100 mm VESA patterns. It also describes tilt, swivel and rotation. Those figures provide a useful checklist, but the manufacturer’s latest manual should take priority if details differ.
| What to check | Why it matters |
|---|---|
| Screen weight without stand | Must fall within the arm’s minimum and maximum load |
| VESA pattern | Needs to match the mounting plate |
| Supported screen size | Helps confirm the screen is within the arm’s intended range |
| Arm movement | Determines how far you can raise, tilt or swivel the monitor |
| Desk compatibility | Clamp or grommet must suit the desktop |
| Adjustment method | Tension may need tuning to prevent drifting or sagging |
The example product page also says it is currently unavailable. That status may not reflect current UK stock, but it’s a reminder to check availability, delivery and the seller’s return policy before ordering.
Desk mounting: clamp or grommet?
A C-clamp grips the edge of the desk, so it’s often the easiest option if your workspace has a sturdy, accessible edge. Check the arm’s maximum desk thickness, the shape of the clamp and whether anything beneath the desk—such as a frame, drawer or cable tray—will get in the way.
The supplied listing gives different thickness ranges for its C-clamp and grommet base, so check the right option rather than assuming they fit the same desks. Its grommet fitting requires a suitable hole through the desk. If your desk doesn’t already have one, drilling it is a permanent change.
Be cautious with glass, hollow-core or fragile desktops. A clamp can put concentrated pressure on a small area. Don’t assume a monitor arm is safe on glass just because the clamp fits; follow the desk and mount manufacturers’ instructions, and use only an approved reinforcement solution if recommended.
Before tightening anything, clear the desk and inspect the underside. A quick check can save you from discovering halfway through installation that the clamp collides with a support rail. Tighten it securely, but don’t over-tighten or damage the desktop.
Adjustability and cable management
An arm’s advertised movement range tells you what it can do, not necessarily what you’ll use every day. Height adjustment is useful for setting a comfortable eye line. Tilt helps reduce reflections or angle the display towards you, while swivel moves the screen from side to side. Rotation can switch between landscape and portrait where the monitor and arm allow it.
The example listing describes 360-degree rotation, plus or minus 90-degree swivel, tilt from plus 90 to minus 90 degrees, a maximum height of 19.7 inches and an arm extension of 21.7 inches. It also notes a restriction for some larger monitors. For a G4, check the product manual for any model-size or configuration-specific limits before assuming every movement is available.
Cable management is another small but useful feature. Built-in clips or channels can guide the display cable along the arm, reducing loose loops behind the desk. Leave enough slack for the arm to move; a cable pulled tight can disconnect or damage a port.
I’d set the height and viewing angle first, then tidy the cables. That way, you won’t have to redo the routing after you’ve found a position that works.
Installation and tension adjustment
Read the manual before attaching the display. The safest approach is to assemble the desk base, fit the VESA plate as instructed and get help supporting the monitor if it’s awkward to lift. Keep the screen face protected while working and use the supplied hardware that the manufacturer specifies.
For a gas-spring arm, the tension may need adjustment to suit the monitor’s weight. The example product page says its arm comes set to medium tension and may need tuning after the screen is mounted. Follow the instructions and make small adjustments with the recommended tool.
If the display slowly sinks, the tension may be too low. If the arm rises by itself or feels difficult to push down, it may be too high. Don’t try to solve either issue by forcing the arm or overloading the VESA screws. Remove the screen first if the manual requires it before tension adjustments.
Once installed, check that the clamp is secure, the display sits level and the arm stays in place through its intended range of motion. If you notice wobbling, slipping or unusual noise, stop using it and recheck the installation rather than assuming the movement will settle on its own.
Pros and cons of a monitor arm
Pros
- Frees up some desktop space beneath the monitor.
- Makes screen height and angle easier to change.
- Can help create a more flexible gaming or study setup.
- Cable channels may reduce visible clutter.
- A clamp or grommet mount can suit different desk layouts.
Cons
- Requires a compatible VESA pattern and suitable screen weight.
- Needs a strong, appropriate desktop and careful fitting.
- Gas-spring tension may take trial and adjustment.
- A heavy-duty model can be more arm than a smaller monitor needs.
- An arm can be more complicated to install than a regular stand.
There’s a small contradiction here: a flexible arm can make a desk feel simpler, but getting it set up properly takes more thought than placing a stand on the surface. If you value easy installation over adjustability, the original stand may be perfectly adequate.
Monitor arm versus original stand
| Feature | Monitor arm | Original stand |
|---|---|---|
| Desk space | Usually clears space beneath the display | Uses space on the desktop |
| Height and positioning | Often offers broader adjustment | Depends on the stand’s built-in adjustment |
| Installation | Requires fitting and compatibility checks | Usually ready to use |
| Desk requirements | Needs a suitable clamp edge or grommet hole | Can sit on the desk surface |
| Best for | Flexible, space-conscious setups | Straightforward, low-adjustment setups |
Choose based on how you use your desk. For example, if you share a small desk between gaming and coursework, the extra space from an arm might be useful. If the monitor already sits at a comfortable height and you don’t move it, switching mounts may add cost and effort without much benefit.
FAQs
Will a monitor arm fit every Samsung Odyssey G4?
No. Check the exact model’s VESA pattern and weight without its stand, then compare both with the arm’s specifications. Confirm the screw type and any adapter requirements in the manuals.
Can I use the heavy-duty MOUNTUP arm described in this guide?
The supplied listing specifies 75 × 75 mm and 100 × 100 mm VESA, monitors from 22 to 49 inches, and a 4.4 to 44-pound weight range. A G4 may fit those limits, but verify your exact model’s details and the current product manual before buying.
Does a Samsung Odyssey G4 need a VESA adapter?
It depends on the precise model and how its mounting holes are arranged. Check the monitor’s instructions and the mount’s plate dimensions; don’t assume an adapter is included or required.
Can I mount an arm on any desk?
No. The desk must be sturdy and suitable for the chosen clamp or grommet fitting. Check its thickness and underside clearance, and follow the desk manufacturer’s advice for glass or delicate surfaces.
Why does my gas-spring arm move or sag?
The tension may not match the monitor’s weight, or the arm may not have been installed correctly. Follow the maker’s adjustment instructions and confirm the monitor is within the arm’s load range.
Is an arm better than the original monitor stand?
It’s better if you want more desk space or frequent position adjustments. The original stand may be better if you prefer a quick, simple setup and its height already works for you.
What should I check before ordering in the UK?
Check the exact model and VESA details, the arm’s weight limits, desk thickness, included fittings, stock status, delivery and the retailer’s returns policy. Confirm that the product listing is for the correct arm rather than a similar-looking model.
Conclusion
A monitor arm can make a gaming or study desk more flexible, but compatibility comes first. Match the exact G4 model’s VESA pattern and stand-free weight to the arm’s specifications, then check the desk fitting, adjustment range and tension instructions.
The heavy-duty arm in the supplied listing is one example, not a guarantee of a perfect fit—and its captured product page says it was unavailable. I’d use its specifications as a checklist, verify the latest manufacturer guidance and choose an arm that suits both the monitor and the desk. That little bit of checking up front can help you build a cleaner, more comfortable setup without an unwelcome wobble.