Introduction
The Samsung Curved Monitor C24F390 is a popular choice for those seeking an immersive viewing experience. Whether you need to transport the monitor, mount it on a wall, or replace its stand, knowing how to properly remove the stand is essential. This guide provides a detailed, step-by-step process to safely and efficiently remove the stand from your Samsung Curved Monitor C24F390.
Why Remove the Stand?
Removing the stand from your Samsung Curved Monitor C24F390 can be necessary for several reasons:
Wall Mounting
If you want to mount your monitor on a wall to save desk space or achieve a cleaner look, you’ll need to remove the stand first. Wall mounting can also provide better ergonomics and reduce neck strain by allowing you to position the monitor at the perfect height and angle.
Transport and Storage
Removing the stand makes the monitor more compact and easier to transport or store. This is particularly useful if you need to move your setup frequently or if you’re planning to take the monitor with you on the go.
Stand Replacement
Sometimes, the original stand might not provide the flexibility or stability you need. Replacing it with a more adjustable or robust stand can enhance your overall experience. This could involve using a stand with height adjustment, swivel, or rotation capabilities.
Tools Needed
Before starting, gather the following tools:
- A Phillips-head screwdriver
- A clean, flat surface to work on
- A soft cloth or towel
Having these tools ready will ensure a smooth and safe removal process.
Step-by-Step Guide to Removing the Stand
Step 1: Power Down and Unplug
The first step is to power down your monitor and unplug all cables. This is crucial for your safety and to avoid any damage to the monitor. Ensure the monitor is completely off before proceeding.
Detailed Instructions
- Power Off: Turn off the monitor using the power button.
- Unplug Cables: Disconnect the power cable and any other connected cables such as HDMI, DisplayPort, or USB.
Step 2: Prepare the Monitor
Place the monitor face-down on a clean, soft cloth or towel. This will protect the screen from scratches and damage during the process. Ensure the surface you are working on is flat and stable.
Surface Preparation
- Choose a Stable Surface: Use a table or desk that provides a flat and stable working area.
- Protect the Screen: Lay a soft cloth or towel to cushion the screen and prevent scratches.
Step 3: Locate the Screws
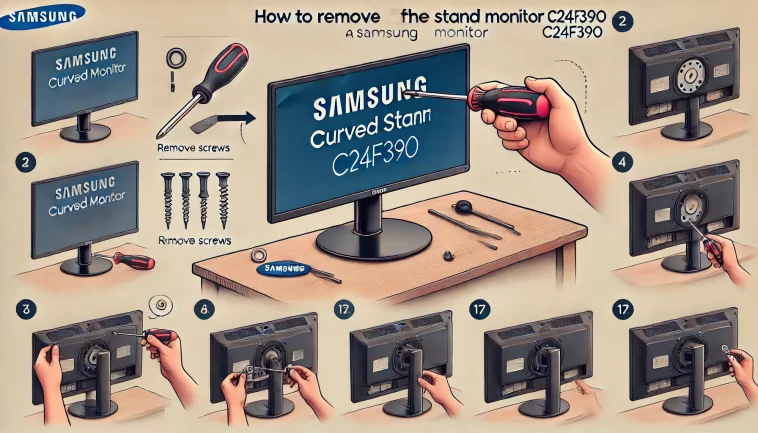
On the back of the monitor, locate the screws that attach the stand to the monitor. These screws are typically found near the base of the stand. The Samsung Curved Monitor C24F390 usually has two screws securing the stand to the back of the monitor.
Finding the Screws
- Check the Base: Look near the base where the stand connects to the monitor.
- Use a Flashlight: If the screws are hard to see, use a flashlight to locate them more easily.
Step 4: Remove the Screws
Using a Phillips-head screwdriver, carefully remove the screws. Keep the screws in a safe place, as you will need them if you decide to reattach the stand in the future.
Removing Screws Safely
- Apply Firm Pressure: Ensure the screwdriver is securely seated in the screw head to prevent stripping.
- Turn Counterclockwise: Twist the screwdriver counterclockwise to remove the screws.
- Store Screws: Place the screws in a small container or bag to avoid losing them.
Step 5: Detach the Stand
Once the screws are removed, gently pull the stand away from the monitor. The stand should come off easily. If you encounter resistance, check to ensure all screws are fully removed.
Detaching the Stand
- Gently Pull: Hold the base of the stand and pull gently.
- Check for Resistance: If the stand does not come off easily, recheck for any remaining screws or clips.
Step 6: Store or Dispose of the Stand
If you plan to store the stand, keep it in a safe place along with the screws. If you are disposing of it, ensure it is done in an environmentally friendly manner.
Storage Tips
- Label the Parts: If storing, label the stand and screws so you can easily find them later.
- Safe Storage: Place the stand and screws in a drawer or box to keep them together and protected.
Safety Precautions
- Unplug the Monitor: Always ensure the monitor is unplugged before attempting to remove the stand.
- Use the Right Tools: Using the correct screwdriver will prevent damage to the screws and monitor.
- Handle with Care: The monitor screen is delicate. Handle it with care to avoid scratches or cracks.
- Follow Manufacturer Guidelines: Refer to the monitor’s manual for any specific instructions or warnings provided by Samsung.
Troubleshooting Common Issues
The Stand Doesn’t Come Off
If the stand doesn’t come off easily after removing the screws, check for any additional screws or clips that might be securing it. Gently wiggle the stand to see if it loosens. Do not force it, as this could damage the monitor.
Possible Solutions
- Double-Check Screws: Make sure all screws are fully removed.
- Inspect for Clips: Some monitors have additional clips or latches holding the stand.
- Wiggle Gently: Apply gentle pressure to loosen the stand without forcing it.
Lost Screws
If you lose any screws, contact Samsung customer support or a hardware store to find replacements. Using the correct screws is important for securely reattaching the stand.
Finding Replacement Screws
- Contact Manufacturer: Samsung customer support can provide exact replacements.
- Visit Hardware Stores: Bring a sample screw to a hardware store to find a match.
- Order Online: Many electronics parts retailers sell replacement screws.
Monitor Stability After Removal
After removing the stand, ensure that the monitor is stored or mounted securely. Use a VESA-compatible wall mount if you plan to mount it on a wall.
Ensuring Stability
- Use VESA Mounts: Confirm the monitor’s compatibility with VESA mounts for secure installation.
- Check Weight Limits: Ensure the mount can support the weight of the monitor.
- Follow Mount Instructions: Carefully follow the mounting kit instructions for a secure setup.
Using a Wall Mount with Samsung Curved Monitor C24F390
Benefits of Wall Mounting
Wall mounting your Samsung Curved Monitor C24F390 offers several benefits:
- Saves Desk Space: Free up valuable desk space for other items.
- Improves Ergonomics: Adjust the monitor to the perfect height and angle to reduce neck and eye strain.
- Clean Aesthetic: Achieve a sleek, clutter-free look.
Choosing the Right Wall Mount
When selecting a wall mount, consider the following:
- VESA Compatibility: Ensure the wall mount is VESA-compatible with the Samsung Curved Monitor C24F390. This model typically supports a 75×75 mm or 100×100 mm VESA mount.
- Weight Capacity: Check that the wall mount can support the weight of your monitor. The C24F390 weighs approximately 3.3 kg (7.3 lbs).
- Adjustability: Choose a mount that offers tilt, swivel, and height adjustments for optimal viewing angles.
Installation Steps
Step 1: Mark the Wall
Use a pencil to mark where the screws for the wall mount will go. Ensure these marks are level and at the desired height.
Step 2: Drill Holes
Using a drill, create holes at the marked spots. Make sure to use the appropriate drill bit size for the screws provided with your wall mount kit.
Step 3: Attach the Wall Mount Bracket
Secure the wall mount bracket to the wall using the provided screws and anchors. Tighten the screws firmly but do not overtighten to avoid damaging the wall.
Step 4: Attach the Monitor Bracket
Attach the corresponding bracket to the back of your Samsung Curved Monitor C24F390. Ensure it is securely fastened using the appropriate screws.
Step 5: Mount the Monitor
Carefully lift the monitor and attach it to the wall mount bracket. Make sure it is securely locked into place.
Step 6: Adjust the Viewing Angle
Adjust the monitor to your preferred viewing angle. Use the mount’s tilt, swivel, and height adjustment features to achieve the best position.
Maintenance Tips for Your Samsung Curved Monitor
Regular Cleaning
Keep your monitor clean by regularly dusting the screen and stand. Use a microfiber cloth to avoid scratching the surface.
Cleaning Steps
- Power Off: Turn off and unplug the monitor.
- Dust the Screen: Use a microfiber cloth to gently wipe the screen.
- Clean the Stand: Wipe the stand and base with the cloth.
- Avoid Liquids: Do not use liquid cleaners directly on the screen. If necessary, lightly dampen the cloth with water or a screen cleaning solution.
Check for Firmware Updates
Regularly check for firmware updates from Samsung to ensure your monitor is running optimally. Firmware updates can improve performance and add new features.
How to Update Firmware
- Visit Samsung’s Website: Go to the support section of Samsung’s website.
- Search for Your Model: Enter your monitor model number (C24F390) to find available updates.
- Download and Install: Follow the provided instructions to download and install the firmware update.
Monitor Positioning
Ensure your monitor is positioned at eye level to reduce neck and eye strain. Adjust the height and angle as needed to achieve the most comfortable setup.
Ergonomic Tips
- Eye Level: The top of the monitor should be at or slightly below eye level.
- Distance: Position the monitor about an arm’s length away from your eyes.
- Angle: Tilt the monitor slightly upward to reduce glare and improve comfort.
Frequently Asked Questions
Can I remove the stand without any tools?
No, you will need a Phillips-head screwdriver to remove the screws securing the stand to the monitor.
Is it safe to remove the stand by myself?
Yes, it is safe to remove the stand by yourself if you follow the proper steps and safety precautions outlined in this guide.
What should I do if I can’t remove the screws?
If the screws are difficult to remove, ensure you are using the correct screwdriver. Applying a little more pressure while turning might help, but avoid stripping the screws.
Can I use a different stand for the Samsung Curved Monitor C24F390?
Yes, you can use a different stand if it is compatible with the monitor’s mounting interface. Ensure it supports the weight and size of the monitor.
How do I mount the monitor on a wall after removing the stand?
Use a VESA-compatible wall mount. Follow the instructions provided with the wall mount kit for secure installation.
Is it necessary to keep the screws after removing the stand?
Yes, keeping the screws is recommended if you plan to reattach the stand in the future.
Conclusion
Removing the stand from your Samsung Curved Monitor C24F390 is a straightforward process if you follow the steps outlined in this guide. By preparing the right tools, handling the monitor with care, and following safety precautions, you can safely detach the stand for storage, transport, or wall mounting. This guide ensures you can accomplish the task without hassle, keeping your monitor in perfect condition. Whether you’re upgrading your setup or simply making more room on your desk, removing the stand opens up a range of possibilities for optimizing your workspace.

